Sunday, February 12, 2012

Chilli Garlic Mushrooms


G.U.I.L.T.Y.

I’ve been lazy and busy. And most times, I’ve been both!

This is precisely why I love New Year resolutions J

Identify your shortcoming, come up with the obvious solution you are most likely already aware of, and make it a New Year resolution.

Guilt Out; New Year fervor in! 
As simple as that.

I have decided to blog more this year.  I was brimming with ideas when I decided to go on a self probation of month long vegetarianism. Hmnn! Not exactly helpful! Especially if you are an avid (avid might be putting it very mildly J) meat/ seafood eater like me.

But a resolution is a resolution is a resolution. So, I’ve been trying different recipes…especially to make my culinary life more interesting for this month.

My younger sister is a fabulous cook and she shared this recipe with me. I gave it a try and loved it.

Ingredients:

Mushrooms 
Corn starch  
Ginger- Garlic Paste ½ tsp
Green Chilli paste ½ tsp
Soy sauce
Salt (to taste)

For the Sauce:

Fresh Ginger 1 inch cube
Fresh Garlic 3 pods
Green Chillies 2
Soy Sauce 2 tbsp
Red chilly Sauce 2 tbsp
Tomato ketchup 2 tbsp
Spring (green) onion 1 bunch
Corn starch 2 tbsp

Recipe:

Take mushrooms in a bowl.
Add Ginger- Garlic paste, green chilli paste,soy sauce and salt, and mix it well.
Let it marinate for around 20 minutes. 
Coat with Corn starch and deep fry them. You could also shallow fry them (as I did)

For the sauce -

In the same oil, add finely chopped Ginger and garlic.
Add finely chopped green chillies and fry for a couple of minutes.
Add Soy sauce, Red Chilly sauce, Ketchup and salt and mix well.

Add Fried mushrooms and saute for a couple of minutes.
Separately, mix corn starch with a spoon of water and add this to the sauce mixture.
Cook till sauce just coats the mushrooms. This should take a minute or two. Don't overcook. 

Garnish with chopped spring onions. I cheated and used cilantro since I didn’t have any spring onions.

Chilli Garlic Mushrooms are ready!

It makes for a great appetizer and can be served as an entrée too. Goes great with Fried Rice.

The one thing Anshuman and I miss India for (food wise, that is J), is good Indo-Chinese. I have a feeling he is not going to complain about that anymore...for a while, at least!

Friday, September 9, 2011

Chocolate Mousse

After my successful last stint at baking a fancy shmancy cake, I was all encouraged to bake another one for the hubby. I had it all planned out, until, he said – No cake.“What! But it’s your birthday”, I protested!

And then he (not so) gently reminded me of the weighing scale. Yeah, that witch-of-a-gadget! Damn you, scale!

The main issue with baking a cake is what do you do with the rest of it, after eating a piece (or two or three)? I would love to take baking lessons and I’ve given it a thought in the past…but then…who is going to finish all that cake?

But a birthday is a birthday is a birthday…and what good is a celebration without some dessert? Right? So I decided I’ll make a dessert that’s pre-portioned and won’t have to sit in the fridge and tempt us for days to come. :)

Instantly, Chocolate Mousse came to mind – that creamy, delicious, chocolatey goodness, that is.

Here is how I made it –

Ingredients:

4 ounces bittersweet chocolate (I tend to use Ghirardelli dark, simply because I love it)
2tbsp unsalted butter
Expresso coffee (2 tbsp/ to liking)
2 cups cold heavy cream
3 eggs
1 tbsp sugar
Raspberries
Mint leaves

The recipe:

* Separate the egg whites and the yolk.
* Heat 3/4 cup cream in a 1-quart heavy saucepan until hot. Whisk together yolks, sugar, and a pinch of salt in a metal bowl until combined well.
* Melt the chocolate in the microwave. Take it out every 15-20 seconds, depending on the strength of your microwave and give it a stir.
* Add butter and coffee to the chocolate and repeat till smooth.
* Add chocolate to the cream and stir frequently.
* Beat egg whites with sugar till they are foamy.
* Fold in egg whites in the chocolate-cream mixture.
* Beat remaining 1 1/4 cups cream in a bowl with an electric mixer until it just holds stiff peaks. Fold in gently.
* Let it cool down completely.
* Spoon mousse into your choice of stemmed glasses and chill. I used a variety of white wine and martini glasses.
* Refrigerate for 3-4 hours.

Making dessert never got so easy!

Garnish with whipped cream, mint leaves and raspberries and you have a winner!

Chocolate mousse is great for entertaining. You can make it ahead of time and it looks super cute!

Saturday, August 20, 2011

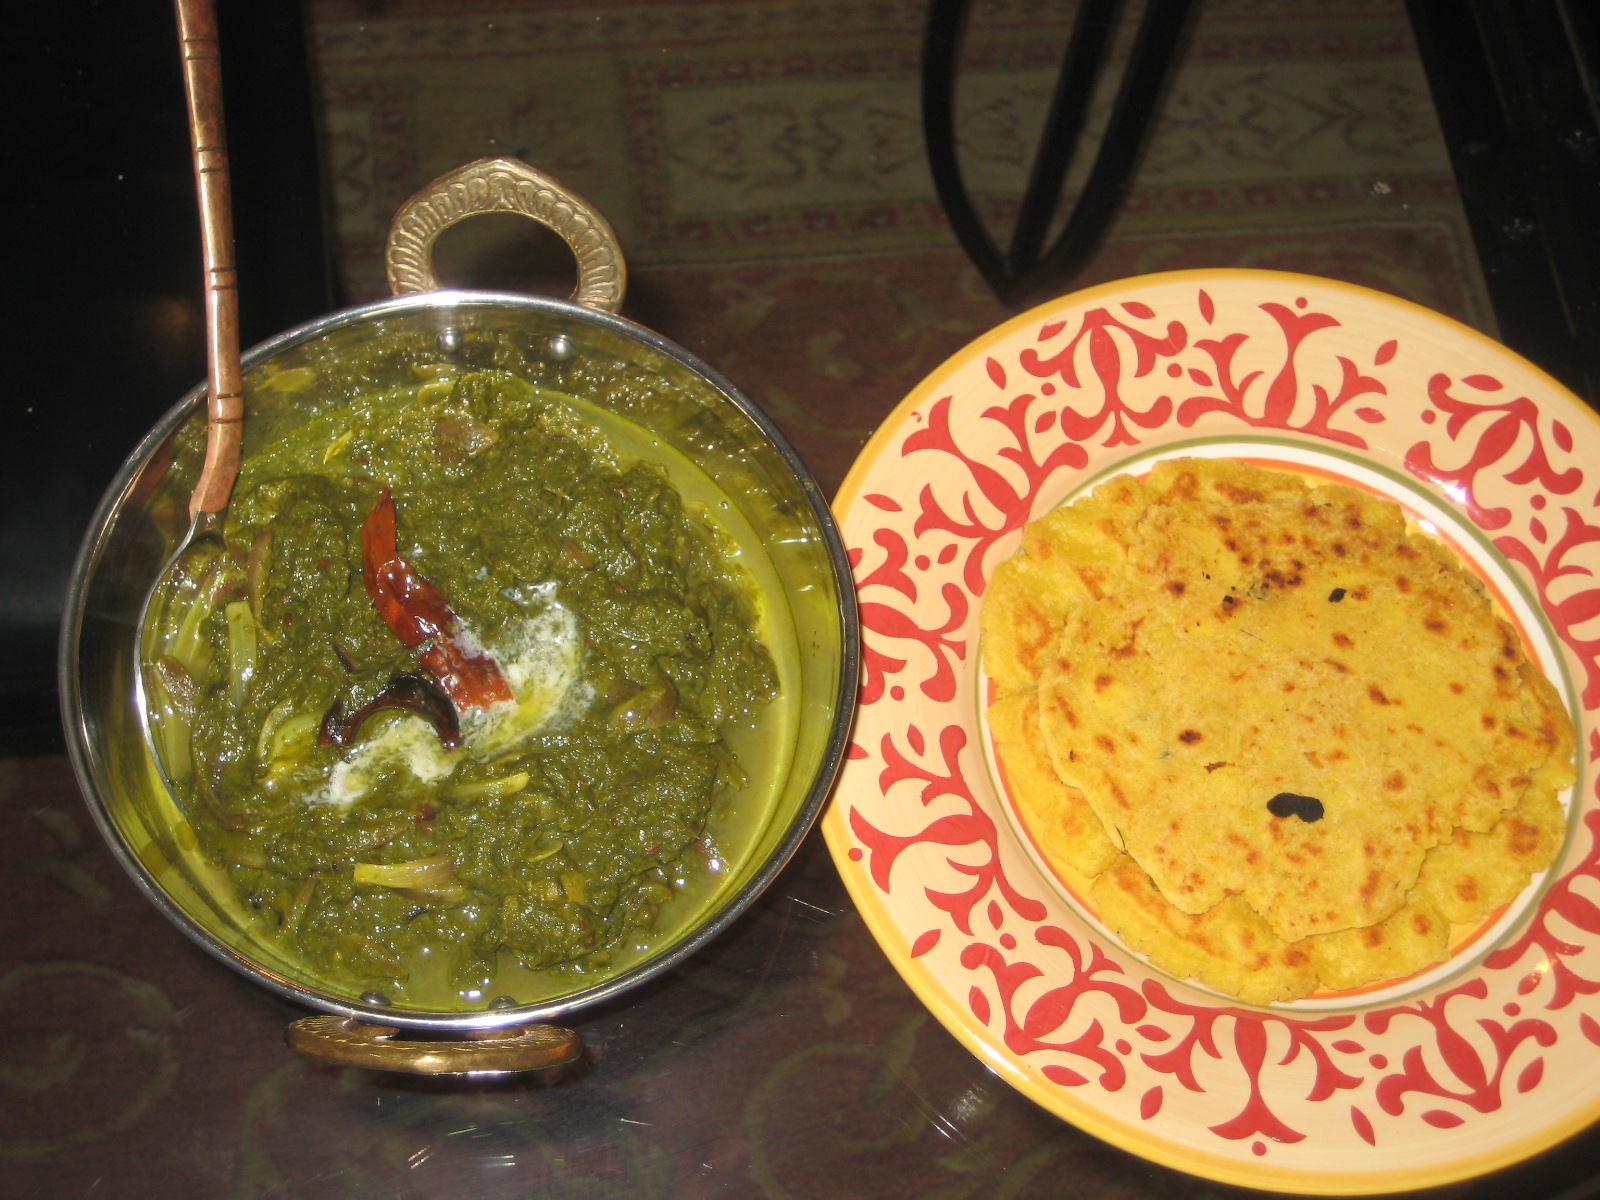
Makke Di Roti Te Sarson da Saag


We Indians love the rain. Maybe because our movies have romanticized them for long. Walking hand in hand in the rain, sharing an umbrella, eating bhutta* by the roadside…gets us reminiscing of those college days? Or perhaps daydreaming of our favorite bollywood songs? Hai na?


It was such a lazy Saturday. Garam-a-garam ginger tea, marie biscuits, the fresh smell of wet soil, the downpour outside and non-stop Miu chatter inside…in short, a beautiful morning!


Anshuman’s cricket got cancelled. Aww, poor hubby! *evil grin*


…And the next thought I had was, Yay! Let’s make a good weekend lunch he’ll enjoy. :) It’s been a while since we had a hardcore Punjabi meal.


So, it was – Makke di roti te Sarson da saag! Nothing gets more “Balle balle” than this!


Sure enough, he was EXCITED to hear about the menu.


Honestly, I’m not a big fan of the makke di roti, it’s too dry for my liking. But what to do? These days, I’m a big fan of Michelle Bachmann, so I tend to be very submissive to my husband (kidding!) Jokes apart, I wanted to give it another chance. And it would just not sound right if I ate saag with regular roti or bread or rice, would it???


So here it is -


For the Saag*


Ingredients:
2 bunches of mustard leaves
1 bunch of spinach leaves
1 big red onion
1 inch cube of ginger
2 cloves of garlic
4-6 red chillies
2 green chillies
Garam masala
Jeera (Cumin seeds)
Methi seeds
Ghee/ Butter :)


Recipe:
* Wash the greens thoroughly.
* In a pressure cooker, put the greens, salt to taste, shredded ginger, garlic, green chillies and cook it all together for around 10-15 minutes.
* Spin them around in a processor for a few times.

Tip: Let the mix get at room temperature before you put it in the processor. Don’t churn it too much; I like my saag to have a little texture than smooth paste.


* Take a wok or kadhai and add ghee/ butter, based on your preference.
* Temper with jeera and methi seeds.
* Add chopped onions and sauté them till they become translucent.
* Add 2 red chillies
* Add the crushed greens.
* Let it cook for another 10-15 minutes till it all comes together.
* In a separate pan or tempering vessel, take a spoon full of ghee (I know, I know! Sorry!).
* When it’s hot, add a pinch of jeera, 2 red chillies and a pinch of garam masala, and top off the saag with this “Tadka” RIGHT BEFORE serving.


For the Makki Roti


Ingredients:
Corn Flour
A pinch of kasoori methi
Salt
Warm water


Recipe:
* Make corn flour dough using warm water and adding salt to taste and a pinch of kasoori methi.


Rolling them out is tricky!
* You’ll have to use a wax sheet or a foil/ plastic wrap as the base.
* Make a ball of dough. Use your hands to spread out the dough by pressing it instead of using a rolling pin. Make sure you spray the surface below the dough with a lot of PAM or grease. Scoop up the pressed dough using a flat spatula, or lift the entire wax sheet if using one.
* Transfer to a hot griddle pan or tawa rom the wax sheet directly. Cook both sides.


Makke Di Roti te Sarson da saag are ready! Don’t forget to top off the saag and roti with a dollop of Amul butter. Pair with a cold lassi and you’re ready to do the “burrrrrrrrrrrrrrrrrrraaaaaaaaaaaaa”.


Meh kya – twaade vaaste ae vi kar lita :) Not bad, eh?


*Saag = Greens
*Tadka = tempering
*Bhutta = Corn on the cob


Thursday, August 4, 2011

Red Velvet cake with White chocolate peppermint frosting, topped off with Kahlua & Dark chocolate sauce!!!

I don’t bake. Maybe because my mom never baked much, I didn't really take to it. Until now. Why now? Because I keep wondering how fun it will be to bake breads and cookies and cakes for Miu baby, and to have baking parties with her and her friends :)
Aww! I’m so happy to have a girl!
Yes, that’s just how it started.


But we always have to find reasons to indulge in sweetness, don’t we? So there it was…Pinkaa’s bday! I decided to bake a different cake. The definition of “different” in my head means “not chocolate”! :) If it were up to me, I would paint the world in chocolate. Dark chocolate, to be precise.


Not quite sure what to make and how to go about it, I asked a colleague and a friend. As avid bakers, both of them shared the same thought – why reinvent the wheel? You can use a cake mix from the store and STILL make it a little fancy, a little gourmet! ;)


Both their recipes were extremely fascinating. So I decided to mix them up!
Here’s what I did.


Ingredients:


For the Red velvet cake 1 package of any red velvet cake mix
1 package vanilla instant pudding mix
1 cup sour cream (fat free)
½ cup water
½ cup vegetable oil
3 eggs
½ cup miniature chocolate chips


For the white chocolate peppermint frosting 4 ounces of white chocolate
4 ounces of cream cheese (reduced fat or fat free)
4 tbsp butter
1 tbsp of peppermint extract


For the liqueur sauce
½ cup miniature dark chocolate chips
Kahlua Liqueur


The recipe:
* Mix all ingredients from the red velvet cake together.


You’ll need to microwave the chocolate chips in the microwave, 15-20 seconds at a time, and stirring them each time.


* Bake the cake per the instructions on the box.
I used two small round pans so I could layer the cake


* Insert a toothpick in the center and see if it comes out clean to check if the cake is done.
* When the cake is done, let it cool off.
You can also stick the cake in the fridge for a little bit. This way, the frosting will stick better. * Mix all the ingredients of the frosting together.
* Give it a spin in the mixer so it becomes fluffy and creamier.
* Stick it in the fridge so it gets nice and cold.
* Liberally apply the frosting between the cakes and on top of it.
* Melt the dark chocolate chips in the microwave.
* Add Kahlua liqueur or any other liqueur of your choice.
Serve a slice of the cold cake topped with a warm drizzle of dark chocolate and kahlua.
This one turned out realllllllllllly yumm!
I’m all kicked now. I can’t wait to bake another one.

Sabudana (Tapioca) Khichdi


It’s not predictable or boring; it has just become tradition nowJ.
Ever since I first learnt that P likes “sabudana khichdi”, her birthday breakfast has always been this. And today is no different.
It’s an easy to make, light breakfast choice. And for me, it’s quite a comfort food.
Here’s how I made it.
Ingredients:
Tapioca i.e. Sabudana (2 cups)
Green chillies (4-5)
Curry leaves
Cumin seeds (Jeera)
Salt (to taste)
Sugar (a pinch)
Boiled potatoes (1 big or 2 small)
Lemon (1/2)
Ingredients for Garnishing:
Peanuts
Coriander
Recipe:
  • Soak the sabudana in water for around an hour.
  • Drain the water out but not completely. A little moisture is great.
  • Add salt, sugar and leave it out overnight.
  • In a pan, take 3-4 tbsp of oil or ghee if it’s a special occasion like today J
  • Temper the cumin seeds and the curry leaves.
  • Add vertically slit green chillies.
  • Add cut up boiled potatoes.
Tip* - I boil the potatoes ahead of time and stick them in the fridge. They are easy to work with and don’t crumble.
  • Add additional salt.
  • Let is sauté for about a min or two.
  • Add sabudana and let it cook for about 10 minutes.
  • You may need to sprinkle little water if it looks too dry.
  • If you can do without adding water, that’s best. Water can make it sticky and lumpy.
  • Squeeze in the lime.
For the garnishing:
  • Add chopped up coriander.
  • Add roasted, crushed peanuts.
Roast peanuts. Remove peel and crush. You can do this ahead of time as well. I usually have a jar of roasted crushed peanuts at home, and it makes for some good salad garnishing.
This is the last birthday for Miss Taneja being just that….Miss Taneja.
A very very very Happy birthday, Pinkaa!!! J We wish you the very best for an amazing year to come.
Who knows what your hubby will have in store for you next year. Or maybe he’ll read this blog and follow my recipe then? J
Pairing – a hot cup of ginger tea!

Thursday, July 14, 2011

Grilled Pork Loin


Hello to you too, dear audience!

Yes, that’s how I speak these days... just like my favorite character, Professor Von Drake from the Disney clubhouse! J

A long hiatus! Definitely not from cooking, but it’s been a busy summer overall to blog about it.

I’d wanted to write my first vegetarian blog, but looks like it’ll have to wait. For today, I present...*ta da*...Grilled Pork Loin!

Let me start by saying I’m not a big pork fan. Of course, who doesn’t like crispy fried bacon? J But I’m talking about pork as an entree. A few years ago, I remember eating a ‘Pork Verde’ by the beach...totally yum and it sure left a lasting impression. But other than that, I’ve never enjoyed it and hence we never cared to cook pork at home.

That notion changed on one of our recent family trips to Door County. The hubby dazzled us all...he marinated pork ribs overnight (not sure if he’s willing to share his secret recipe) and slow cooked them in the oven for over 3 hours. Boy, they were D.E.L.I.C.I.O.U.S!

I was so impressed; I had to grill pork again. So we got pork loin from the newly opened Mariano’s store by our house. I must tell you, that store is fabulous. If I liked doing groceries earlier, I LOVE it now!

I decided to marinate the pork loin in my version of a quick-fix verde sauce. This is a no-brainer 10 minute preparation that you’ll love. Here is what I did -

Ingredients:

Tomatillos (2 small)

Jalapeno (1 or 2, depending on preferred spice level)

Ginger (1/4th an inch)

Garlic (1/2 a clove)

Onion (1/4 small onion)

The recipe:

§ Dry roast the tomatillos

§ In a grinder, mix all the ingredients along with the roasted tomatillos.

(Tip: while making the marinade, use as much little water as possible)

§ Make cuts in the pork loin and marinate with this mixture.

§ Refrigerate for about an hour or two.

§ Grill in the oven at 325 F for about an hour. Keep checking periodically.

Serve right off the oven. A nice cold salad and/or coleslaw compliment the grilled pork perfectly.

To my Angry birds, your revenge has been taken! J

To my vegetarian friends, my next blog is for you. I promise!

Thursday, April 28, 2011

Tiranga Kebabs

“- incredible heat, humidity, crazy traffic, pollution, crowds...yet...a true sense of belonging! It’s good to be back”. This is what my facebook status said. And I cannot say it any better.

I was visiting India after 3 long years, and it felt like I never left.
The instant connection is what truly makes you feel “at home”. With a baby in tow this time, I was definitely nervous. I had heard a few scary stories from friends of their kids falling sick, and I was praying our trip stayed rather uneventful. Meher was a trooper, after all. She did great and we had a fabulous trip!

What was the highlight of our trip? Food...and more food, of course! After all, what good is an India trip if you don’t indulge shamelessly! We ate...and ate...and some more. After my initial hesitation to try roadside treats, I readily gave in...And tried very objectionable and questionable foods off the street :) thankfully, the immune system cooperated well.

Oh wait, wait, wait!! How can I possibly forget our FANTASTIC world cup victory! What a high! That was the perfect icing on the cake. See, I’m still thinking food :)

Anyhow, I got back here a few (??) pounds heavier and exhausted with eating Indian cuisine day in and day out. I said to the hubby – that’s it! No more Indian cooking for a month now. And barely 2 weeks later, here I am, craving Indian food (go figure!) and missing home...

So, I thought Tiranga* kebabs will be the perfect, healthy way to celebrate Miu’s 10 month birthday (wow, 10 months! Time sure flies. Happy 10 month birthday, my darling baby!)

Ingredients:

2lbs Boneless Chicken Breasts
Yoghurt
I can’t believe it’s not butter (you can skip this if you like)
Ginger
Garlic
Red chilli powder
Shaan Tandoori masaala
Almonds
Cashews
Sour cream
Black peppercorn or white peppercorn (if you have it)
Green chillies
Fresh Coriander
Mint Leaves


The recipe:

* Cut the boneless chicken in cubes.
* Rub salt and lime and refrigerate for a few hours.

(Tip: while making the marinade, use as much little water as possible)

The Saffron Kebab:

* Melt 1tbsp ‘I can’t believe it’s not butter’ in a microwave for 5 seconds.
* Mix the butter, 3 tbsp plain yoghurt, 2 garlic cloves, 1 inch ginger cube, salt (add less than usual since you’ve already rubbed the chicken with salt), 2tbsp of Shaan tandoori masaala, more red chilli powder (to taste) in a mixer.
* Marinate 1/3rd of the chicken cubes in this mix and refrigerate for 30 mins.

The White Kebab:

* Mix 1tsbp of plain yoghurt, 2 garlic cloves, 1 inch ginger cube, 10-12 almonds, 10-12 cashews, 1 tbsp sour cream, 8-10 black pepper seeds (white peppercorn is preferred) in a mixer.
* Marinate 1/3rd of the chicken cubes in this mix and refrigerate for 30 mins.

The Green Kebab:

* Mix 1 bunch of fresh coriander, 4-5 leaves of fresh mint, 2-3 green chillies, 1 tbsp yoghurt, 1 tbsp sour cream, 1 inch cube of ginger and 2 garlic cloves in a mixer.
* Marinate 1/3rd of the chicken cubes in this mix and refrigerate for 30 mins.

The Chutney:

* Mix 1 bunch of fresh coriander, 4-5 leaves of fresh mint, 1-2 green chillies, 3 tbsp yoghurt, 1/2 inch cube of ginger, 1 garlic clove, ½ tbsp of tamarind pulp, ½ tbsp of sugar in a mixer.
* Marinate 1/3rd of the chicken cubes in this mix and refrigerate for 30 mins.

(The chutney is very similar to the green kebab marinade. You want to tone down the ginger-garlic since the chutney is not getting cooked. The tamarind and sugar gives a good sweet-sour flavor).

* Preheat oven to 350 F
* Arrange the kebabs on a skewer in a tricolor fashion
* Spray pam nonstick on the kebabs and the baking tray (baking tray is not necessary)
* Bake for 15-20 minutes and broil at 400F for last few minutes so it gets a glaze.
* Check repeatedly to ensure chicken is not getting overcooked.

Serve hot. Tastes great with mint-coriander chutney and grilled pearl onions.

India won the world cup and the celebration that followed on the streets was unbelievably euphoric! I screamed out aloud “Bharat Mata Ki Jay”!! It felt GREAT.

(If you are an Indian reading my blog, you should try it too…and the recipe as well :))


Tiranga* refers to the national flag of India. The term Tiranga means tri-colored – deep saffron, white and green.